Setting up SCIM - Okta
This article describes how to set up SCIM within the Security Journey Okta App.
What is SCIM?
SCIM is an open standard for automating user provisioning across domains, reducing the time and complexity typically associated with onboarding.
- It removes the need for manual user management and minimizes human error, meaning program admins can spend more time with learners
- We support syncing learner attributes to Security Journey.
f you need additional support in how to set up and configure Okta Attributes, please refer to these Okta Help Desk Articles:
Prerequisites
In order to set up SCIM on Security Journey with Okta, you will need:
Security Journey
- An account with Admin privileges
Okta
- Okta, version 2016.07 or later
- A user with Application Admin privileges
Supported Features
Our SCIM Integration support the following features:
- Create Users
- Update User Attributes
- Deactivate Users
For more information on the listed features or terms, visit the Okta Glossary.
Configuration Steps
1. Login to Okta with your Admin account, navigate to Applications
2. Click "Browse App Catalog"

3. Search for "Security Journey" and choose "Add Integration"
.png?width=525&height=263&name=Screenshot+2022-11-30+at+3.13.53+PM+(1).png)
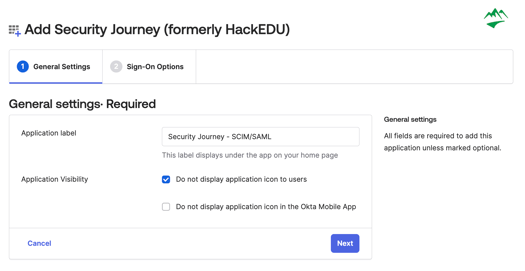
4. After adding the application, you can update the application label (if desired). You will also want to check the box under Application Visibility > Do not display application icon to users. Then click Next.

5. You will then be presented with the Sign-On Options: Require, make any necessary changes here and then click "Done."
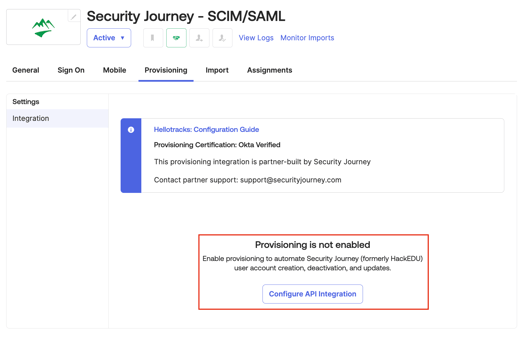
6. The new application will open on the Assignment tab. You will need to navigate to the Provisioning tab next and choose "Configure API Integration"

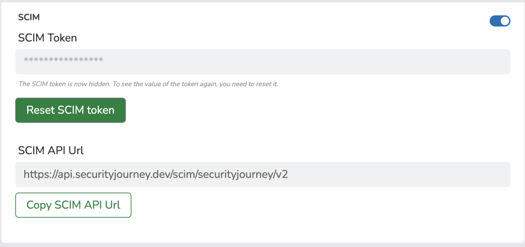
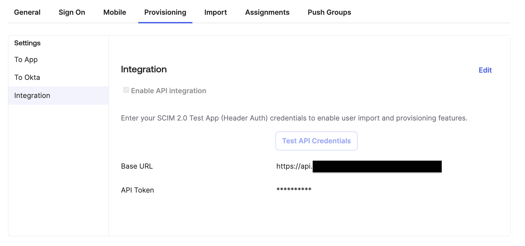
7. From here, check the "Enabled API Integration" check box and copy paste the SCIM API URL and SCIM Token from the SCIM settings in Security Journey. For more information on generating a SCIM API URL and Token check out this article.

8. Once you've copied and pasted the SCIM API URL and SCIM Token into Okta, you will need to click "Test API Credentials." If successful, it will look like this.

9. From here, you will navigate to Provisioning > Settings > To App and click "edit." You will want to enable the options below and click save:
- Create Users
- Update User Attributes
- Deactivate Users

10. Finally, we recommend updating the Assignments setting by assigning a test user or small group of users to the application and verify synchronization via Okta logs & inside Security Journey:
- Okta is generally near-instant when propagating updates. However, this is not guaranteed and may take up to an hour to fully sync over to Security Journey.
11. Once you've successfully tested, you can update the group assignment as needed.
Learner Attributes
Okta required fields
The following are fields are required for a user to be created via Okta and are mapped by default.
urn:ietf:params:scim:schemas:core:2.0:Userschemauser.userName→userNameuser.firstName→name.givenNameuser.lastName→name.familyName
Enterprise user fields
The following enterprise user fields are optional and are mapped by default.
urn:ietf:params:scim:schemas:extension:enterprise:2.0:Useruser.employeeNumber→employeeNumberuser.department→department
Core user fields
The following user fields are optional and are mapped by default.
urn:ietf:params:scim:schemas:core:2.0:Useruser.title→titleuser.Country→addresses[0].country
Custom Security Journey user attributes
The following fields are custom user attributes and Okta does NOT map these by default. These are added as attributes in the profile editor for your Okta application.
Any value can be mapped to these fields. They can be used to populate custom assignments and used for more detailed reporting.
urn:ietf:params:scim:schemas:extension:SJUserAttributes:2.0:User- This is our custom schemajob_role- We recommend usinguser.userTypefrom the core users schema.company- We recommend usinguser.organizationfrom the enterprise user schema.business_unit- We recommend usinguser.costCenterfrom the enterprise user schema.team_name- We recommend usinguser.divisionfrom the enterprise user schema.security_champion- This is for users go above and beyond for security. We recommend setting this to the boolean value offalse.
The only attribute that is required for Security Journey is emailAddress - all other attributes are optional. For more information on how to configure custom SCIM user attributes, check out this article.
Troubleshooting Guide
Do you support capitalization in email addresses?
No. All email addresses are normalized to lowercase. If your IdP or Active Directory requires capitalization, adjust the emailAddress you send to Security Journey so it matches in lowercase.
Why isn't SCIM updating my learner's attributes?
Overview
If SCIM isn’t updating learner attributes as expected, it’s often related to how users were assigned to the application in Okta before provisioning was fully enabled.
Root Cause
When users are assigned to the Security Journey application before SCIM provisioning is enabled, they may be missing an External ID. This ID is required for SCIM to properly link and update learner attributes.
Solution
To resolve this issue:
-
In Okta, unassign the affected learner from the Security Journey application.
-
Reassign the learner to the application.
-
This will force Okta to reprovision the user and create the required external link (External ID).
Once the External ID is generated, SCIM should correctly update the learner’s attributes going forward.
Additional Notes
-
This issue only affects users assigned before SCIM provisioning was enabled.
-
Newly assigned users should not experience this problem.