Create New Enterprise Application
If you would like to set up SSO with Azure AD, please follow the steps below:
- Sign in to the Microsoft Entra admin center as at least a Cloud Application Administrator
- Browse to Identity > Applications > Enterprise applications > All applications
- Choose All Application > Select "+ New Application"
- Select "+ Create your own application"

- Next, input the name for your new application:
- Enter "Security Journey" and click "Create"
- From the SSO Overview page, choose "Set up single sign on."

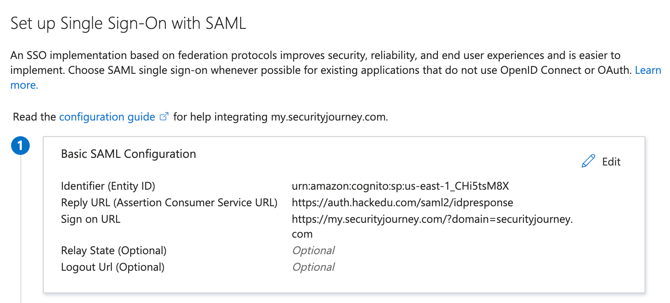
Basic SAML Configuration
In Section 1, update the Basic SAML Configuration:- Entity ID: urn:amazon:cognito:sp:us-east-1_CHi5tsM8X
- Assertion Consumer Service URL: https://auth.hackedu.com/saml2/idpresponse
- Sign on URL: https://my.securityjourney.com/?domain=(insert your domain)
Attributes & Claims
By default, Microsoft Entra maps user.userprincipalname as the Unique User Identifier, which Security Journey uses as the user’s emailAddress.
Only Email, First Name, and Last Name are required to create a user, but additional learner attributes can be added via SAML Claims. See this article for supported fields and configuration details.

SAML Certificates
In Section 3, download your new application's Federation Metadata XML and upload it to the Security Journey Platform here.
